For this post I figured I’d attempt something that I have zero experience with. I’ve been meaning to look into Open vSwitch for a while so I decided to deploy it running on a nested KMV server running inside of ESXi. I deployed the environment using both Ubuntu 14.10 Server and CentOS 7. Since Ubuntu turned out to be easier, I’m going discuss it in this post and possibly do another post using CentOS 7.
Create the KVM server
We want to start off by creating a VM on the ESXi host that will be our KVM server. As William Lam describes in this post, we need to expose hardware assisted virtualization to the VM. I’m also going to give the VM 4 vCPUs as I’ve seen the CPU load spike to 100% when using a 1 or 2 vCPUs while running nested VMs. Depending on how many VMs and their configuration, you will need to specify the proper memory and hard disk sizes. Here is what my configuration looks like:
If you’ve ever ran VMs on a nested ESXi host, you’re probably aware that the portgroup our KVM VM is connected to needs to have specific portgroup security options set in order for the KVM VMs to access the network. I’ve found that both Promiscuous mode and Forged transmits need to be enabled. I created a new portgroup called “vlan3_mgmt_ovs” and modified the security settings:
During the installation of the Ubuntu OS, the only package I chose to install was the SSH Server. After the installation, go ahead and update the system by running:
sudo apt-get update
sudo apt-get upgrade
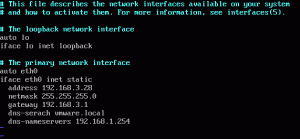
I then set a static IP by editing /etc/network/interfaces to look like:
Install KVM
Install KVM and some other utilities that we will need.
sudo apt-get install qemu-kvm libvirt-bin ubuntu-vm-builder bridge-utils cpu-checker vnc4server virtinst
Verify that KVM is okay:
chris@kvm-ubuntu:~$ kvm-ok
INFO: /dev/kvm exists
KVM acceleration can be used
Add our user to the KVM group:
sudo adduser `id -un` kvm
Create an Open vSwitch
First watch this great video Introduction to Open vSwitch (OVS)
Install by Open vSwitch by running:
sudo apt-get install openvswitch-switch openvswitch-common
Create an Open vSwitch named ovsbr0:
sudo ovs-vsctl add-br ovsbr0
Display the new switch:
chris@kvm-ubuntu:~$ sudo ovs-vsctl show
de8e3d0f-5ee3-43bd-b495-62ed37578309
Bridge “ovsbr0”
Port “ovsbr0”
Interface “ovsbr0”
type: internal
ovs_version: “2.1.3”
If you’re connected to the VM via ssh, you will want to jump over to the VM’s console because we are going to make some networking changes that will disconnect you from ssh.
Move eth0 over to our new Open vSwitch ovsbr0:
sudo ovs-vsctl add-port ovsbr0 eth0
At this point your ssh connection should be dead. You can can confirm that eth0 is now on the bridge by running
chris@kvm-ubuntu:~$ sudo ovs-vsctl show
de8e3d0f-5ee3-43bd-b495-62ed37578309
Bridge “ovsbr0”
Port “ovsbr0”
Interface “ovsbr0”
type: internal
Port “eth0”
Interface “eth0”
ovs_version: “2.1.3”
Re-configure the KVM VM’s networking
The following set of commands will get our VM back online:
Remove the IP from eth0
sudo ifconfig eth0 0
Move the IP to ovsbr0
sudo ifconfig ovsbr0 192.168.3.28 netmask 255.255.255.0
Delete the default route if necessary.
route del default
Add the default route back using ovsbr0
route add default gw 192.168.3.1 dev ovsbr0
At this point you should be able to ssh back into the VM, but if you reboot, the IP will be back on eth0 so let’s modify /etc/network/interfaces so that the networking is OK on boot.
I grabbed most of this info from http://zcentric.com/2014/07/07/openvswitch-kvm-libvirt-ubuntu-vlans-the-right-way/
Here is my modified /etc/network/interfaces file:
auto eth0
allow-ovsbr0 eth0
iface eth0 inet manual
ovs_bridge ovsbr0
ovs_type OVSPort
pre-up ifconfig $IFACE up
post-down ifconfig $IFACE down
address 0.0.0.0
auto ovsbr0
allow-ovs ovsbr0
iface ovsbr0 inet static
address 192.168.3.28
netmask 255.255.255.0
gateway 192.168.3.1
ovs_type OVSBridge
ovs_ports ovsbr0
pre-up ifconfig $IFACE up
post-down ifconfig $IFACE down
dns-search vmware.local
dns-nameservers 192.168.1.254
Reboot the VM and verify that the networking looks good. It should look like this:
Notice how my IP 192.168.3.28 is on ovsbr0 and there is no IP configured for eth0.
Create a KVM network that our guest VM can use
When I created a KVM guest VM using the method that I’m going to use, I couldn’t find a way to tell the VM to use our Open vSwitch ovsbr0 so I’m going create a KVM network that maps to ovsbr0.
Create the XML file “ovs-network.xml” :
<network>
<name>ovs-network</name>
<uuid>f034aa05-6852-4ba8-927f-e209e6828e10</uuid>
<forward mode=’bridge’/>
<bridge name=’ovsbr0’/>
<virtualport type=’openvswitch’/>
</network>
I generated the UUID above by running a utility called uuidgen. You can install it by running:
sudo apt-get install uuid
Create the new network
sudo virsh net-define ovs-network.xml
Start the network and configure it to autostart
sudo virsh net-start ovs-network
sudo virsh net-autostart ovs-network
Verify state of the new network:
sudo virsh net-list
 Name                 State      Autostart     Persistent
----------------------------------------------------------
 default              active     yes           yes
 ovs-network          active     yes           yes
Install a guest VM on the KVM server
Before we can create a VM, we have to apply the fixed described in bug 1393842.
Now we can start creating some shell variables that define our VM. I’ve already copied the ISO images into /var/lib/libvirt/images folder at this point. I believe you can place it elsewhere but you may have to make some modifications to SELinux to allow KVM to access it.
os=”–os-variant=rhel7 –disk path=/var/lib/libvirt/images/CentOS-7.0-1406-x86_64-Minimal.iso,device=cdrom”
net=”–network network=ovs-network”
disk=”–disk /var/lib/libvirt/images/vm1.img,size=5″
src=”–cdrom=/var/lib/libvirt/images/CentOS-7.0-1406-x86_64-Minimal.iso”
gr=”–graphics vnc,listen=0.0.0.0″
cpu=”–vcpus=1″
ram=”–ram=768″
name=”vm1″
Create the VM:
sudo virt-install $os $net $disk $src $gr $cpu $ram –hvm –noautoconsole –name=$name
You should see:
Starting install…
Creating domain… | 0 B 00:00
Domain installation still in progress. You can reconnect to
the console to complete the installation process.
Let’s see what VNC display it is running on:
sudo virsh vncdisplay vm1
:0
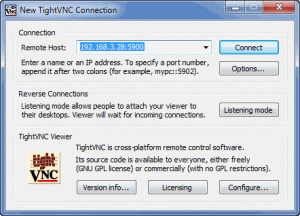
We should now be able to access our VM via VNC. I’m using TightVNC. Above we saw that the VM is running on display 0. This corresponds with VNC port 5900. If the VM said it w as running on display :1, the VNC port would be 5901.
You should see the install wizard:
The VM was able to get a DHCP address from my network:
After the installation you will need to reboot the VM. You’ll find that it doesn’t actually come back up and if you list the available VMs, you’ll see that it’s powered off:
sudo virsh list –all
Id Name State
—————————————————-
– vm1 shut off
Start it back up by running:
sudo virsh start vm1
Domain vm1 started
After installation the VM is able to ping the internet:
Conclusion
We started with a fresh ESXi VM, installed and configured KVM and Open vSwitch, and then installed a VM that has full network connectivity. There is a lot of info on the web, but I couldn’t find anything for this exact scenario so I hope it helps someone avoid a lot of the issues that I ran into. For example, even though I run a lot of nested ESXi hosts and have to configure the portgroup security, I completely forgot about it in this case. My nested KVM guest couldn’t communicate with my network and I couldn’t understand why. I ran tcpdump and saw ARP requests being sent out of the VM, but nothing on my network was seeing them. I finally realized why and was deeply ashamed.
William Lam’s blog post uses a different way of creating the KVM guest other than using install-virt. I’m pretty sure that his method allows you to specify the Open vSwitch network without having to define KVM network. In the interface section you would just need to specify the Open vSwitch information:
<interface type=’bridge’>
<mac address=’52:54:aa:00:f0:51’/>
<source bridge=’ovsbr0’/>
<virtualport type=’openvswitch’/>
</interface>
Also, if you’re going to create your KVM VM’s disk ahead of time with the qemu-img command, make sure you specify the preallocation=metadata parameter or the KVM VM’s OS will see the disk as something extremely small and you won’t be allowed to proceed with the install. Here is how you can specify the parameter:
qemu-img create -f qcow2 -o preallocation=metadata /var/lib/libvirt/images/vm1.img 5G
References
I read a lot of pages to make this work. Thanks everyone below for providing information for me to cobble together from.
- http://wiki.libvirt.org/page/VirtualNetworking
- https://help.ubuntu.com/community/KVM/Installation
- https://bugs.launchpad.net/ubuntu/+source/libvirt/+bug/1393842/comments/2
- http://zcentric.com/2014/07/07/openvswitch-kvm-libvirt-ubuntu-vlans-the-right-way/
- https://n40lab.wordpress.com/2015/01/25/centos-7-installing-openvswitch-2-3-1-lts/
- http://www.virtuallyghetto.com/2014/09/how-to-run-qemu-kvm-on-esxi.html
- http://networkstatic.net/installing-and-configuring-openvswitch-on-ubuntu-12-04-precise-pangolin/
- https://www.youtube.com/watch?v=rYW7kQRyUvA
- http://www.opencloudblog.com/?p=177
- http://git.openvswitch.org/cgi-bin/gitweb.cgi?p=openvswitch;a=blob_plain;f=INSTALL.KVM;hb=HEAD
- http://blog.scottlowe.org/2013/08/21/accessing-vnc-consoles-of-kvm-guests-via-ssh/
- http://blog.scottlowe.org/2012/11/07/using-vlans-with-ovs-and-libvirt/
- https://www.redhat.com/archives/libvirt-users/2013-May/msg00043.html
- http://www.linux-kvm.org/page/Networking


Hi! When you did this did you discover that your VMs attached to your portgroup on the VDS would get (DUP!) ping responses when attempting to ping your VMs running inside your KVM server? or perhaps when pinging the KVM server itself? I’m finding that when I adjust the portgroup’s “Promiscuous mode” and “Forged transmits” to Accept then I see duplicate packets (not just pings) on the wire. If you did see this behavior how would you prevent it?
Oh man it’s been so long ago, but I don’t remember any dups. However, I have seen the DUP! messages while ping testing in my lab. In those cases I found that it was an actual duplicate on the the network. Removing the duplicate IP on the network resolved the issue. It was when I was using multiple vCloud Director environments and accidentally overlapped some networks. Sorry, I know that probably doesn’t help.