Table of Contents
You can find all of the config files on the GitHub page.
Overview
We’re going to manage our certificates by using CloudFlare’s PKI/TLS toolkit. This makes working with certificates really easy. For this walkthrough I’m only going to use a root CA with no intermediates. I performed the same Kubernetes deployment using my lab’s CA with intermediates and it works fine, but using the CloudFlare tool is easier to explain.
If you want to set your own CA for your lab, I’d suggest taking a look at https://jamielinux.com/docs/openssl-certificate-authority/. You’ll gain experience with setting up your own CA, intermediates, creating certificate signing request, revoking certificates, etc. I used to only use certificates in my lab if I had to, but now every service in my lab uses signed certificates. You’re mostly going to have to deal with them so you may as well get good at them. I used to dread them, but now they are no big deal.
The examples below contain information that’s specific to my lab. You’ll need to replace entries where necessary. Don’t let any of the below you scare you. You can pretty much copy and paste and change some entries. If you mess up, delete the config files and try again.
Install CloudFlare’s PKI/TLS toolkit
You can do this on any Linux/OSX machine. I’m not sure if they have a Windows version.
curl -O https://pkg.cfssl.org/R1.2/cfssl_linux-amd64
chmod +x cfssl_linux-amd64
sudo mv cfssl_linux-amd64 /usr/local/bin/cfsslcurl -O https://pkg.cfssl.org/R1.2/cfssljson_linux-amd64
chmod +x cfssljson_linux-amd64
sudo mv cfssljson_linux-amd64 /usr/local/bin/cfssljson
Create the Certificates
CA Config
echo '{
  "signing": {
    "default": {
      "expiry": "87600h"
    },
    "profiles": {
      "kubernetes": {
        "usages": ["signing", "key encipherment", "server auth", "client auth"],
        "expiry": "87600h"
      }
    }
  }
}' > ca-config.json
CSR Config
echo '{
  "CN": "Kubernetes CA",
  "key": {
    "algo": "rsa",
    "size": 2048
  },
  "names": [
    {
      "C": "US",
      "L": "Arvada",
      "O": "Kubernetes",
      "OU": "CO",
      "ST": "Colorado"
    }
  ]
}' > ca-csr.json
Create CA cert and key
cfssl gencert -initca ca-csr.json | cfssljson -bare ca
Create Kubernetes CSR
This is a long one because I’m creating SAN entries for each node in short and long format, IP addresses for each node as well as some other IP addresses. The IP address 172.16.0.10 is going to be the IP address of the skydns service that we will deploy later. If I didn’t have this entry, the skydns containers would fail to start and I’d see certificate errors in the logs. Adding the IP as SAN entry resolved it. kube-controller13.vmware.local is the HAProxy Load Balancer that we will set up later.
cat > kubernetes-csr.json <<EOF
{
  "CN": "kubernetes",
  "hosts": [

    "kube-controller13.vmware.local",
    "kube-etcd0.vmware.local",
    "kube-etcd1.vmware.local",
    "kube-etcd2.vmware.local",
    "kube-controller0.vmware.local",
    "kube-controller1.vmware.local",
    "kube-controller2.vmware.local",
    "kube-worker0.vmware.local",
    "kube-worker1.vmware.local",
    "kube-worker2.vmware.local",
    "kube-controller13",
    "kube-etcd0",
    "kube-etcd1",
    "kube-etcd2",
    "kube-controller0",
    "kube-controller1",
    "kube-controller2",
    "kube-worker0",
    "kube-worker1",
    "kube-worker2",
    "kube-etcd0",
    "kube-etcd0",
    "192.168.3.201",
    "172.16.0.1",
    "192.168.3.176",
    "192.168.3.177",
    "192.168.3.178",
    "192.168.3.179",
    "192.168.3.180",
    "192.168.3.181",
    "192.168.3.182",
    "192.168.3.183",
    "192.168.3.184",
    "10.240.0.32",
    "127.0.0.1",
    "172.16.0.10"
  ],
  "key": {
    "algo": "rsa",
    "size": 2048
  },
  "names": [
    {
      "C": "US",
      "L": "Arvada",
      "O": "Kubernetes",
      "OU": "Kubernetes Lab",
      "ST": "Colorado"
    }
  ]
}
EOF
Create the Kubernetes certificate and key
cfssl gencert \
-ca=ca.pem \
-ca-key=ca-key.pem \
-config=ca-config.json \
-profile=kubernetes \
kubernetes-csr.json | cfssljson -bare kubernetes
At this point you should have the following certificates:
- ca.pem
- kubernetes.pem
- kubernetes-key.pem
Copy certificates to all the nodes
scp ca.pem kubernetes.pem kubernetes-key.pem root@kube-etcd0:~/
scp ca.pem kubernetes.pem kubernetes-key.pem root@kube-etcd1:~/
scp ca.pem kubernetes.pem kubernetes-key.pem root@kube-etcd2:~/
scp ca.pem kubernetes.pem kubernetes-key.pem root@kube-controller0:~/
scp ca.pem kubernetes.pem kubernetes-key.pem root@kube-controller1:~/
scp ca.pem kubernetes.pem kubernetes-key.pem root@kube-controller2:~/
scp ca.pem kubernetes.pem kubernetes-key.pem root@kube-worker0:~/
scp ca.pem kubernetes.pem kubernetes-key.pem root@kube-worker1:~/
scp ca.pem kubernetes.pem kubernetes-key.pem root@kube-worker2:~/
Verifying the certificates
If you’re not too experienced with certificates, you’d check out SSLShopper’s SSL Certificate Tools. From there you can copy and paste your certificates and get information on them. They also give you the equivalent openssl command to use.
If you’re a Windows user and want to look at the certificates, you may want to change the file extensions on ca.pem and kubernetes.pem to crt. If I open kubernetes.crt on my Windows machine I get:
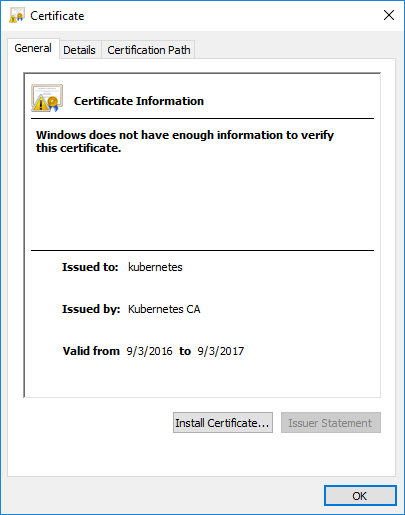
You can see that there isn’t enough information to verify the certificate. All this really means is that I haven’t installed the CA certificate (ca.crt) to the Windows Trusted root certificate authorities store. I’ll open ca.crt now:
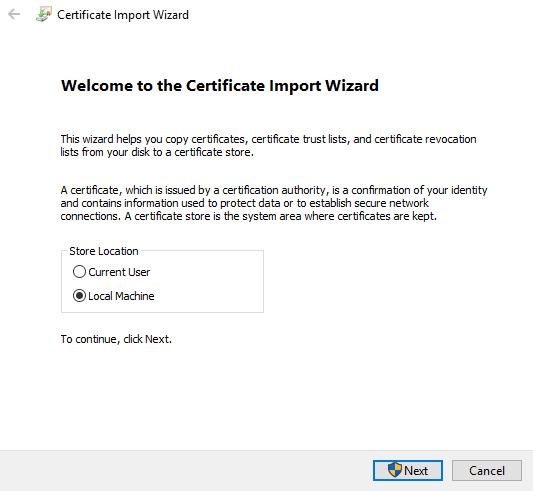
Select Install Certificate

Select Local Machine and Next
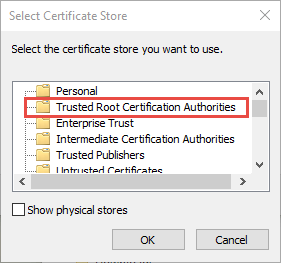
Select Trusted Root Certification Authorities
Finish the wizard and re-open ca.crt:
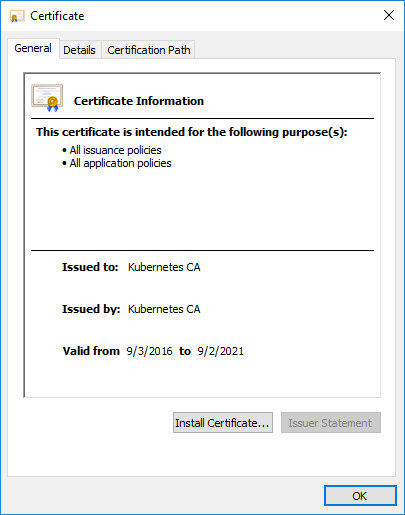
It looks much better now. Since that’s fixed, let’s look at the kubernetes.crt file:
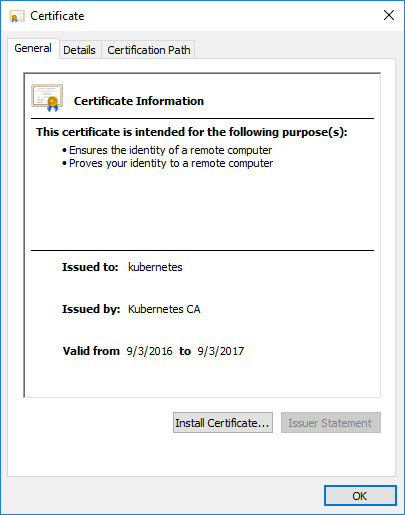
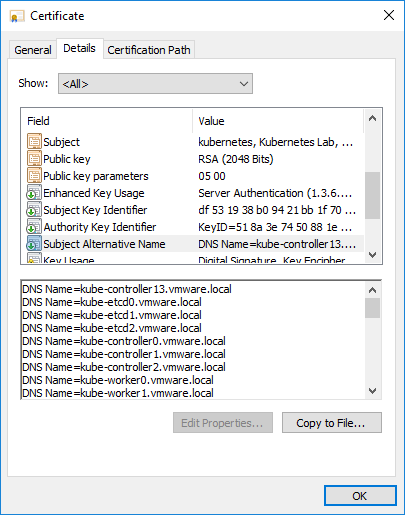
Looks good. If we go to the Details tab and select Subject Alternate Name, we can see all the names we see all the names we requested the certificate be valid for: