Overview
In this post how show how to set up vSphere Integrated Containers (VIC) and integrate them into vRealize Automation (vRA). The vSphere Integrated Containers documentation can be found here. I’ll only reference the Install Guide in this post.
vSphere Integrated Container resources:
The following software versions were used:
- vSphere Integrated Containers 1.0 (or 0.8?)
- vRealize Automatin 7.2
- vCenter 6.0 U2 Build:3634794
- ESXi: 6.0 U2 Build: 3620759
Getting vSphere Ready
There a couple of things that we need to do at the vSphere layer before we can install VIC. You can view all he prerequisites here.
Networking
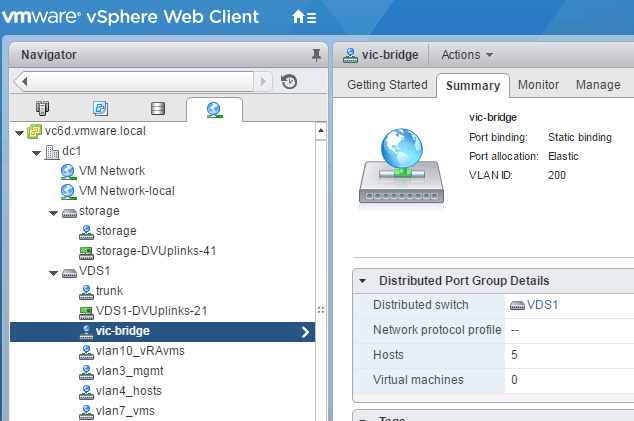
You can read about VIC’s networking here. The only network that I’m going to add to my environment is the bridge network named vic-bridge. For all of the VIC networks, I’ll use an existing network named vlan3_mgmt.
Here you can see the vic-bridge network with a VLAN of 200:
Firewall
Add a firewall entry on each ESXi host as describe here.
Installing VIC
Grab the vSphere Integrated Containers Engine package from the VIC download page. This package contains the vic-machine utility, which we will use to deploy a Virtual Container Host (VCH). In VIC, containers run in VCHs.
Installing vic-machine
You can install the vic-machine on Windows, Linux and OSX. I’m going to install it on CentOS 7. Run the following commands to install and get ready to use vic-machine:
tar xzvf vic_0.8.0-7315-c8ac999.tar.gz
export PATH=$PATH:~/vic
mv vic/vic-machine-linux vic/vic-machine
cd vic
Simple Virtual Container Host Deployment
First, we are going to deploy a simple Virtual Container Host (VCH). It will use a self-signed certificate, the default hostname and use DHCP. Later we will deploy a more advanced VCH.
The following will deploy a basic VCH. You can see all of the vic-options here.
vic-machine create \
–target vc6d.vmware.local \
–user “administrator@vsphere.local” \
–password VMware1! \
–public-network vlan3_mgmt \
–bridge-network vic-bridge \
–no-tlsverify \
–force \
–compute-resource cluster1 \
–image-store nfs-ds412-hybrid0
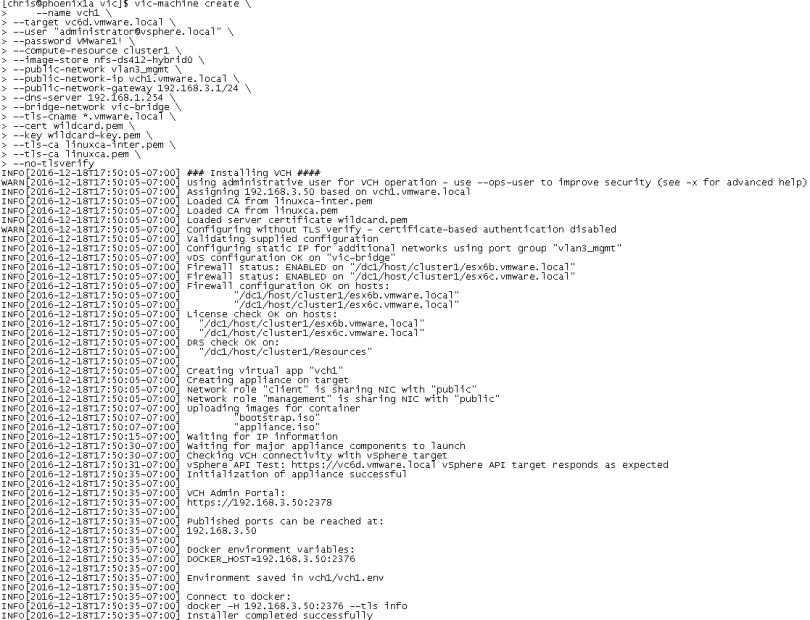
You should see the following output:
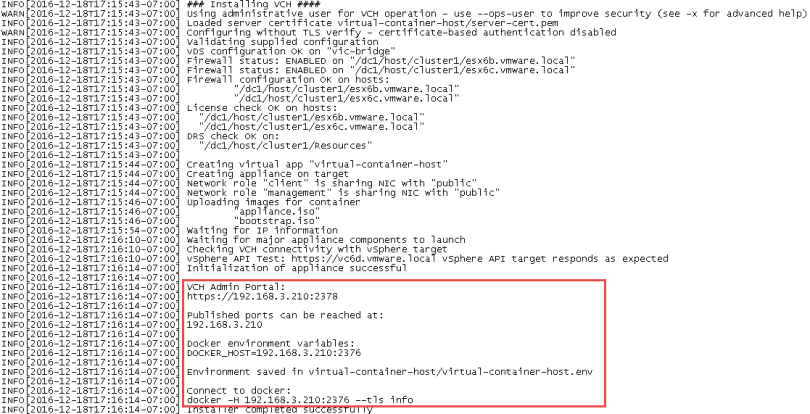
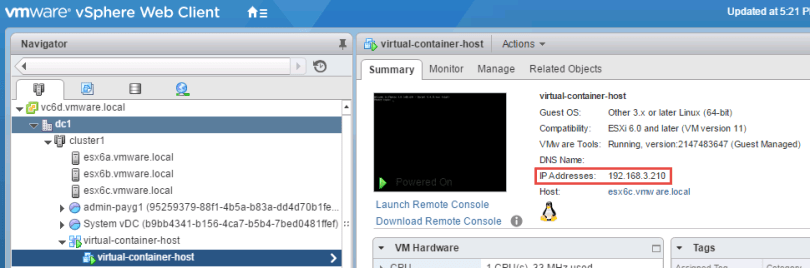
From this output, you can see that our VCH picked up the IP address 192.168.3.210. If you look in vCenter, you’ll see a vApp and VM with the name virtual-container-host:
If you need to delete the VCH, you can do so with:
vic-machine delete \
–target vc6d.vmware.local \
–user “administrator@vsphere.local” \
–password VMware1! \
–compute-resource cluster1

Test the VCH Deployment
We’re going to install docker to test our VCH deployment. We’ll see that the VCH can be used like any other docker host. Well, almost. The documentation mentions that the VCH doesn’t have all functionality of a real docker host.
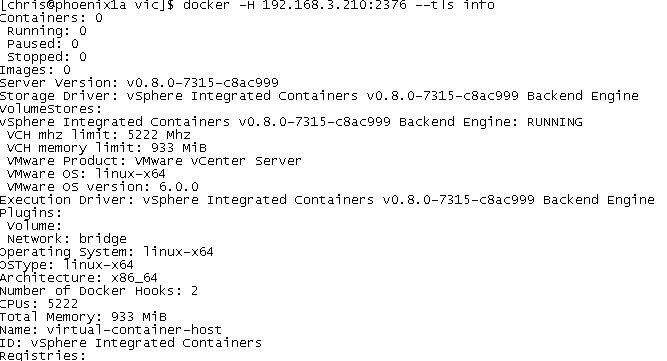
After we install docker, we can verify that we can communicate to the VCH:
docker -H 192.168.3.210:2376 –tls info
Now that we know we can communicate with the VCH, let’s deploy a container running the nginx web server. In this example, I’ll map the host’s port 80 to the container’s port 80:
docker -H 192.168.3.210:2376 –tls run -d -p 80:80 –name nginx1 nginx

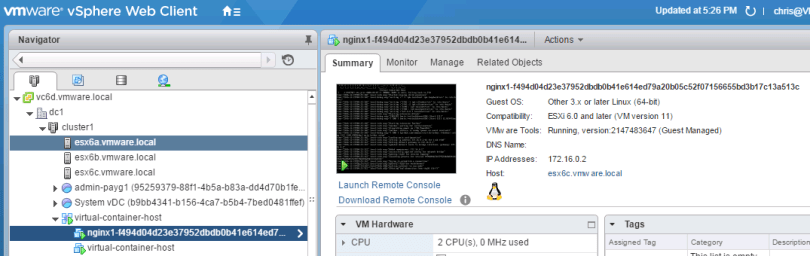
If we look at vCenter once the container has been deployed, we’ll see a new VM under our VIC vApp:
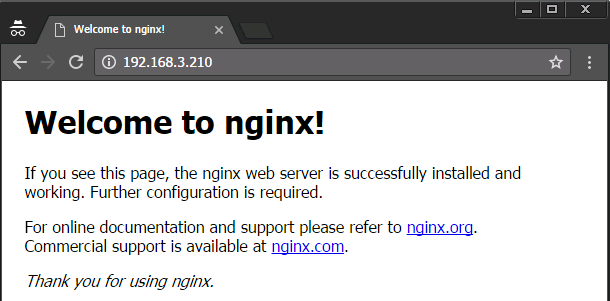
If we open a web browser and go to the address of the VCH, we will see the nginx welcome page:
Cleanup
We can perform some clean up by running some normal docker commands:
List all containers
docker -H 192.168.3.210:2376 –tls ps -a

Stop the nginx1 container
docker -H 192.168.3.210:2376 –tls stop nginx1
Delete the nginx1 container
docker -H 192.168.3.210:2376 –tls stop nginx1
Delete the nginx image
docker -H 192.168.3.210:2376 –tls rmi nginx
Advanced VCH Deployment
This example will be similar to the simple VCH deployment but we will specify the following VCH options:
- Name
- IP, gateway and DNS
- Certificate and private key
- Intermediate CA certificate
- Root CA certificate
- CNAME
See VCH Deployment Options for a full options listing.
vic-machine create \
–name vch1 \
–target vc6d.vmware.local \
–user “administrator@vsphere.local” \
–password VMware1! \
–compute-resource cluster1 \
–image-store nfs-ds412-hybrid0 \
–public-network vlan3_mgmt \
–public-network-ip vch1.vmware.local \
–public-network-gateway 192.168.3.1/24 \
–dns-server 192.168.1.254 \
–bridge-network vic-bridge \
–tls-cname *.vmware.local \
–cert wildcard.pem \
–key wildcard-key.pem \
–tls-ca linuxca-inter.pem \
–tls-ca linuxca.pem \
–no-tlsverify
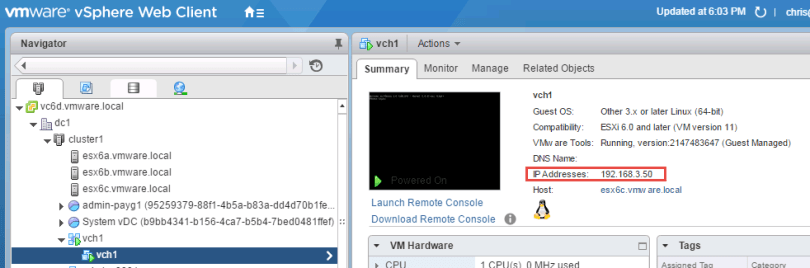
In vCenter you can see that we have our custom name and IP address:
Other than that, it behaves just like the simple VCH deployment.
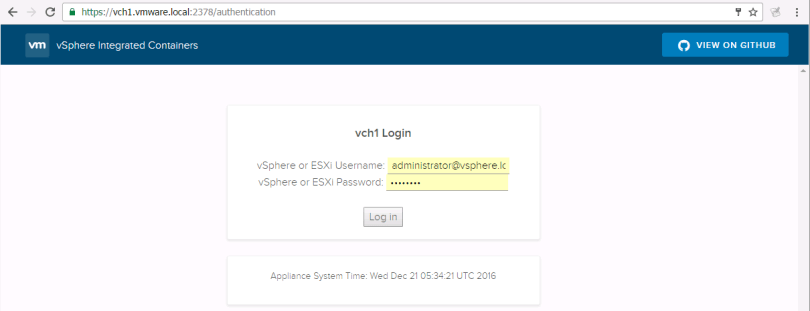
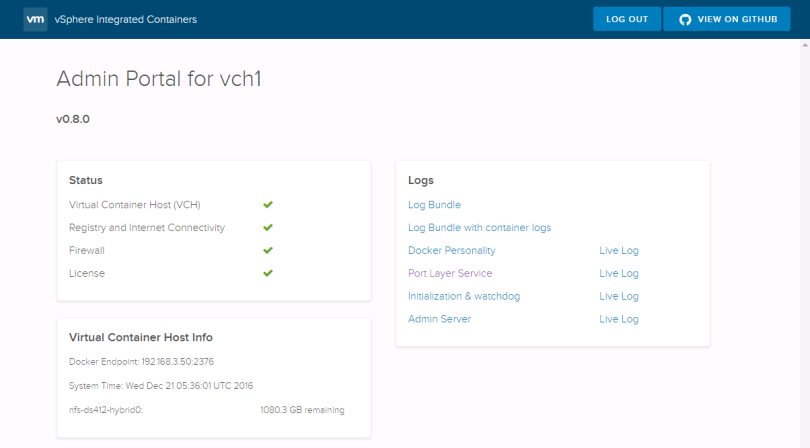
VCH Admin Portal
You can access the VCH Admin Portal by going to port 2378 on the VCH:
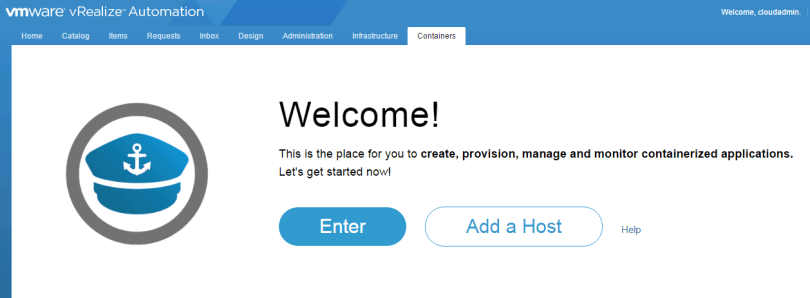
Add the Virtual Container Host to vRealize Automation
From the vRA portal select the Containers tab and then Enter:
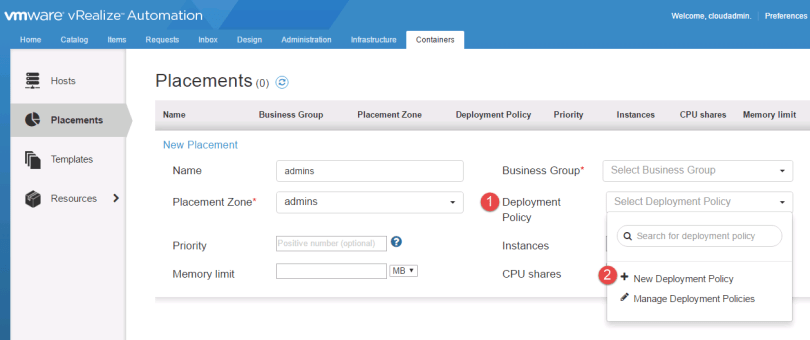
Create a Placement
We need to create a Placement before we can create a VCH. This can be done by performing the following:
- Select Placements
- Provide a name
- Select a a pre-existing vRA Business Group
- Selec the Placement Zone dropdown box and then
- Select New Placement Zone
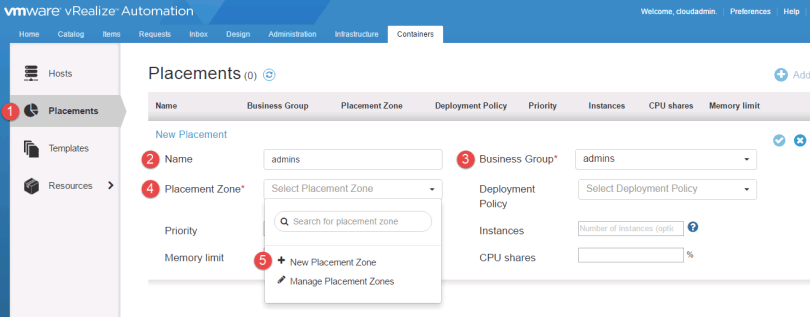
- Give the Placement Zone a name
- Choose whether or not to dynamically allocate resources.
- Assign/Create any tags that you want
- Select the checkmark to save

Create a Deployment Policy by performing the same steps as you did for the Placement Zone:

- Review your settings and
- Select the checkmark to create your Placement
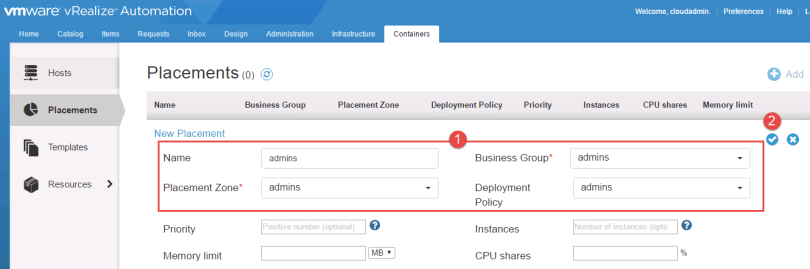
Here is what mine looks like:

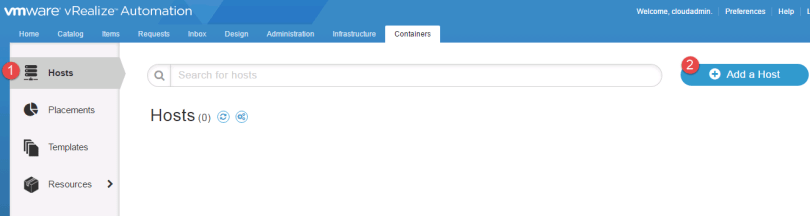
Add Virtual Container Host
Now we can add a VCH by selecting 1) Hosts and 2) Add a Host
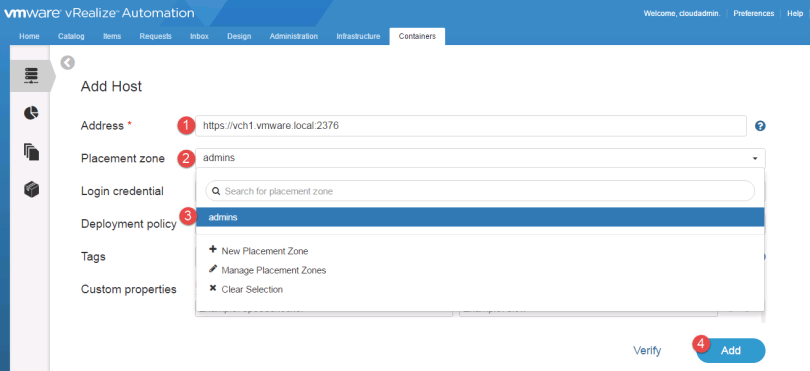
- Provide the address of your VCH. Notice the port. If you happen to have not used SSL when deploying the VCH (with the –no-tls option), you’ll want to change the port to 2375.
- Select a Placement zone dropdown box
- Select the previously created Placement zone.
- Select Add to create the VCH.
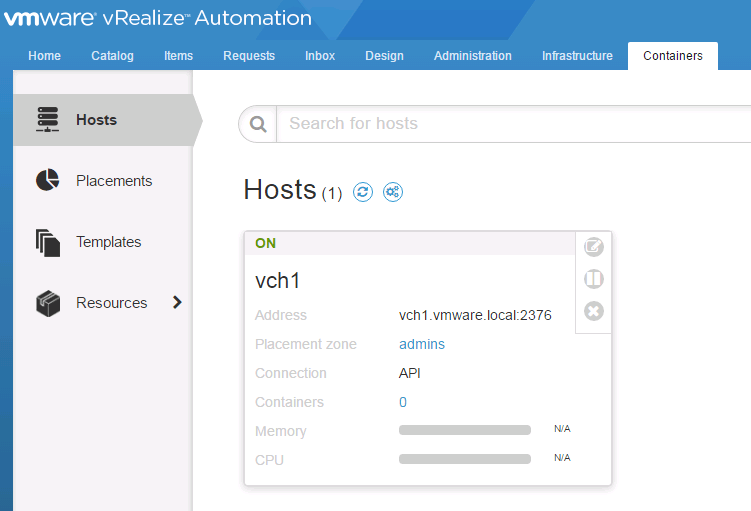
If everything goes well, you’ll see your VCH:
Deploy a Container
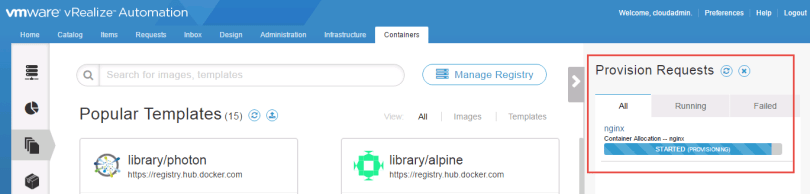
Let’s verify that we can deploy a container on our VCH. For this exercise we are going to deploy a nginx web server. From the Containers tab, select:
- Templates
- The down arrow next to Provision
- Enter additional info

If your familiar with docker, you’ll recognize a lot of the options here, but we’re only going to change the Port Bindings. We can do this by doing the following:
- Select the Network tab
- Enter 8080 for the Host port
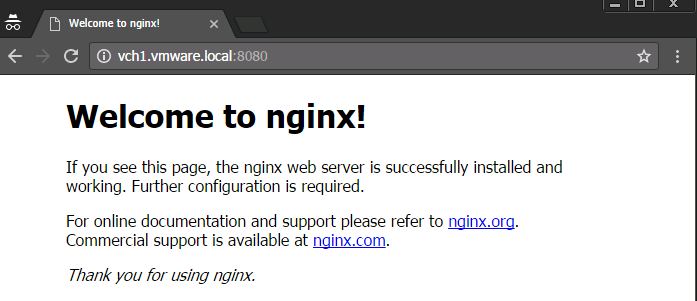
- Enter 80 for the Container port. Steps 2 and 3 will result in the containers port 80 being mapped to the VCH’s port 8080.
- Select Provision to create the container.

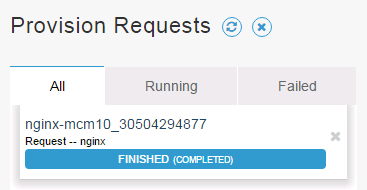
You can view your provisioning request on the right:
Once the request completess you can view the container by selecting the 1) Resource and 2) Containers:
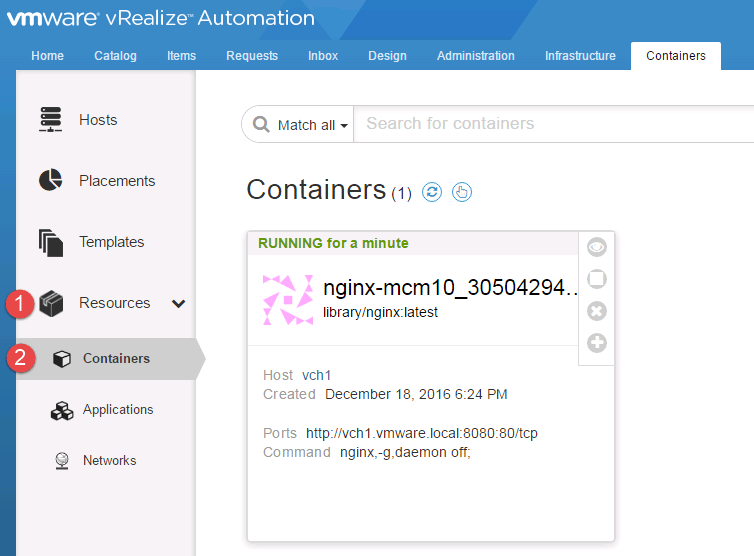
Since we mapped the VCH’s port 8080 to the containers port 80, we can open a web browser and go to port 8080 on the VCH and see the container’s nginx application:
In the next post I’ll show how you can publish containers as vRA Catalog Items.
