As of version 1.1.4, PKS uses version 2.0 of the NCP pod. This pod is responsible for performing managing resources in NSX-T, which includes creating routers, switches, allocating IPs, etc. Unfortunately, in version 2.0 of the NCP pod there is an issue where each time the pod is restarted, it will create duplicate virtual servers in NSX-T. This is especially problematic because PKS uses a small load balancer which can only have 10 virtual servers. Let’s see this in action.
First I’m going to explain the issue, but if you’d like to go directly to the fix, see the section Preventing the duplicate virtual servers below.
Reproducing the issue
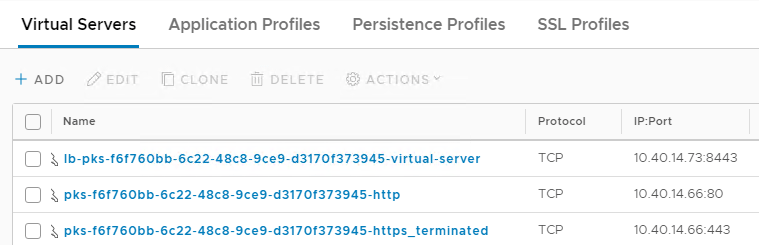
With a newly created PKS cluster you will have 3 virtual servers:
We can find the NCP pod in the pks-infrastructure namespace:
kubectl get pod -n pks-infrastructure
NAME                       READY     STATUS    RESTARTS   AGE
nsx-ncp-6849b5f564-sltn7   1/1       Running   0          23h
nsx-node-agent-lgvvn       2/2       Running   0          23h
Now I’m going to delete the pod and it will be re-created since it’s being managed by a Kubernetes deployment’s replication set:
kubectl delete pod nsx-ncp-6849b5f564-sltn7 -n pks-infrastructure
If we list the pods again, we will see that one NCP pod is being terminated and another is being created:
kubectl get pod -n pks-infrastructure
NAME                       READY     STATUS        RESTARTS   AGE
nsx-ncp-6849b5f564-m8cmt   1/1       Running       0          47s
nsx-ncp-6849b5f564-sltn7   1/1       Terminating   0          1d
nsx-node-agent-lgvvn       2/2       Running       0          1d
In NSX-T manager we will soon see two duplicate virtual servers:
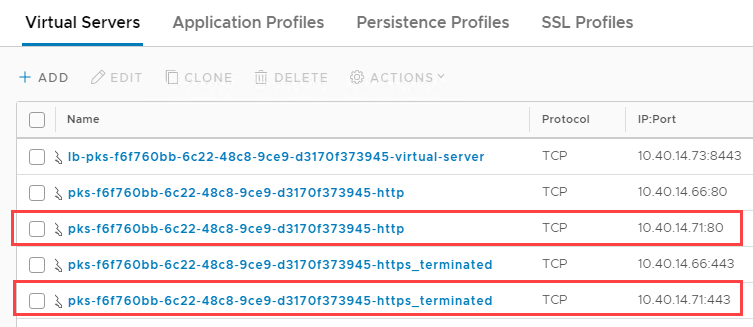
After deleting the pod a few more times I end up with 10 virtual servers:

Now let’s say I create a new service of type load balancer:
kubectl expose deployment web2 –port 80 –type LoadBalancer
I’ll look at the services to get the external IP and see that it’s stuck in a pending state:
kubectl get svc
NAME         TYPE           CLUSTER-IP       EXTERNAL-IP   PORT(S)        AGE
kubernetes   ClusterIP      10.100.200.1     <none>        443/TCP        1d
web1         LoadBalancer   10.100.200.140   10.40.14.75   80:30684/TCP   2m
web2         LoadBalancer   10.100.200.176   <pending>     80:30021/TCP   25s
The problem here is that the NCP pod is trying to create another virtual server, but we are at the limit of 10. This can verify this by looking at the NCP pod’s logs:
kubectl logs nsx-ncp-6849b5f564-9tfkl -n pks-infrastructure
Here we will see the problem:
2018-08-17T22:49:36.140Z 8a339617-c86e-469c-8cfd-0c609104d53e NSX 7 – [nsx@6876 comp=”nsx-container-ncp” subcomp=”ncp” level=”ERROR” errorCode=”NCP05010″] nsx_ujo.k8s.service_watcher Failed to trigger l4 loadbalancer service ADDED handler for service web2 in namespace default: Unexpected error from backend manager ([‘192.168.100.110′]) for Loadbalancer service update : Failed to update loadbalancer service 59cee434-2db1-400c-bd3f-6870820e4573 with virtual servers [u’98dc54d8-573d-44f8-8396-bfb96118e0c4′, u’59e6a99e-4d45-4f39-a6b5-95c8dfec9abb’, u’3b56d349-6fbf-43bc-b9d7-6aa47119b7ed’, u’6f23abcf-862e-4eec-a1f8-f82e49cd889a’, u’5c2ea1f6-d6e1-46bb-aa82-b0aee577566a’, u’ce605d7a-1001-4510-9be3-8dd947fc4164′, u’d8fe77be-1d65-4b05-a39c-c17cff71fe94′, u’29255b72-8846-4ec0-a9fa-0e7c6ec60d1c’, u’50bff666-33f7-4659-802e-df1328b99413′, u’47a24388-3656-4d5e-95a3-4af21fd37071′, u’cceeec8d-5967-4b5c-a16e-2cd6d3ded148′]: Unexpected error from backend manager ([‘192.168.100.110’]) for PUT api/v1/loadbalancer/services/59cee434-2db1-400c-bd3f-6870820e4573 : Found errors in the request. Please refer to the relatedErrors for details. relatedErrors: Exceed maximum number of virtual servers on the Load balancer service. The maximum size of virtual servers for SMALL load balancer service form factor is 10, current size of virtual servers is 11.
Cleaning up NSX-T
In order to remove the duplicate virtual servers we will have to first detach them from the load balancer. If you try to do this through the UI by going to the virtual server > Load Balancer > select the load balancer and then detach, you’ll get the following “error”:
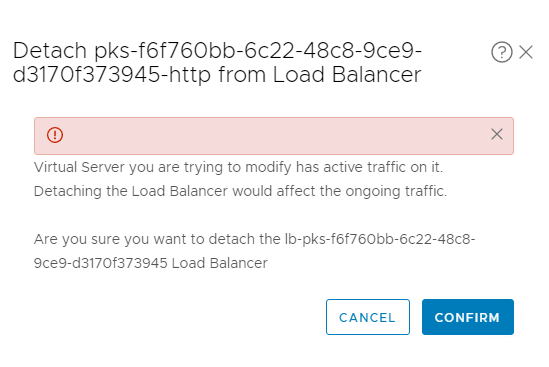
This is because it’s a protected object created by an NSX-T super user and even an admin can’t delete it. However, we can detach it by making an API call and setting the X-Allow-Overwrite header to true. We can get the API call easily using Chrome and opening the developer tools by selecting the three verticle dots menu > More tools > Developer tools > Network tab. Try the detach operation again and you’ll see an entry named batch inside the developer tools:

Right-click this item and select Copy > Copy as cURL (bash). Go to a Linux terminal and paste in the cURL command. Now add -k -H “X-Allow-Overwrite: true”. It should look like this:

Press enter and make sure you get a 200 status code:
{
  "results" : [ {
    "code" : 200,
    "body" : {
      "resource_type" : "LbService",
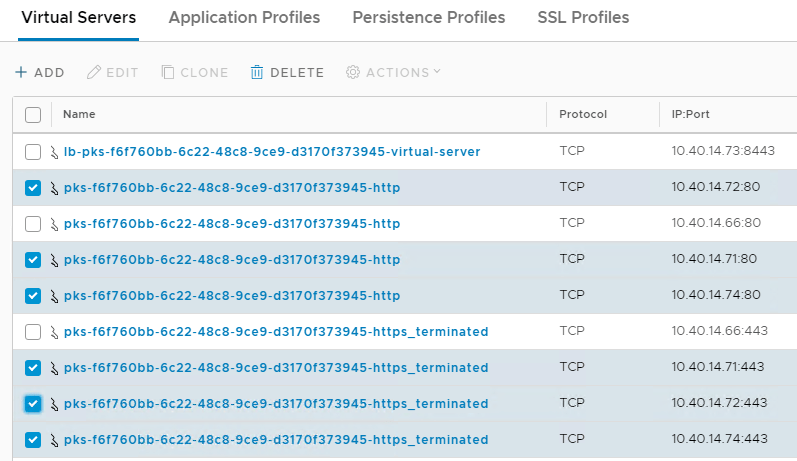
You’ll need to do this for each virtual server you want to delete. Once you’re done you can delete all the virtual servers by selecting them and selecting delete.
Ignore any errors you receive on performing the delete. You can perform the same steps you did to detach the virtual servers, and you should receive a status 200 code for each virtual server you delete.
If you receive a big error in NSX-T while performing these steps, don’t panic. Most likely you were viewing a resource that was deleted via the API and NSX-T threw the error. Perform a full refresh on the page and everything should be okay.
Preventing the duplicate virtual servers
Now that everything is cleaned up, we can provide the duplicates by performing the following steps.
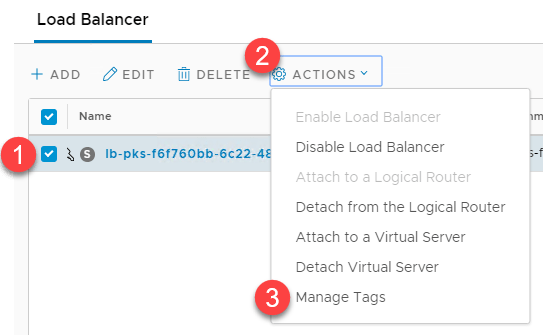
Add tags to the cluster’s load balancer
- Select your cluster’s load balancer
- Actions
- Manage Tags
Add the following tags:
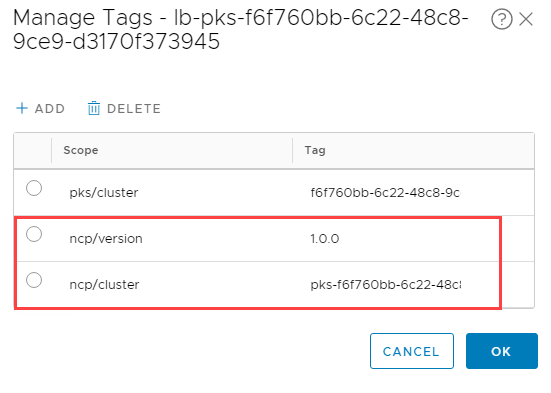
The ncp/cluster value is just pks- proceeded by the cluster ID found in the pks/cluster tag.
Edit the NCP pod’s config map:
kubectl edit configmap nsx-ncp-config -n pks-infrastructure
Comment out the line that has lb_service = lb-pks-<your cluster id> so it looks like this:

Now you don’t need to worry about the duplicate virtual servers being created. If you had any services that were stuck getting an external IP address, the NCP pod won’t allocate the IP after you make virtual servers available. You’ll need to either re-create the service or restart the NCP pod.
Be aware that if the worker node running the NCP gets re-created (through an upgrade, BOSH resurrection event, etc.) the configmap will need to be updated again.
