I’m going to show you how you can use vRealize Automation (vRA), Ansible, Powershell, GitLab and Jenkins together to test software deployments. There are many ways to accomplish what I’m going to demonstrate, but I’m going the simple route in most cases as it will be easier to cover in blog form. Throughout the post I’ll point out other options you may want to explore.
The end result is that when we push new code to our repository it will kick off a Jenkins job that will provision a vRA machine which will proceed to install software based off our updated code.
Versions Used
- vRA 7.2
- Ansible 2.3
- Jenkins 2.46.3
- GitLab 9.2.5
- CentOS 7.2 Minimal
vRA Configuration
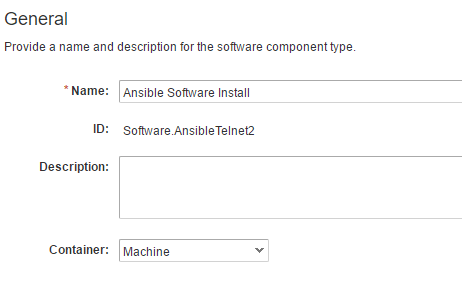
Software Component
I’m going to use a vRA Software Component to execute the Ansible playbook that will install software. In the vRA portal go to Design > Software Components (you’ll need to have a vRA Enterprise License to use Software Components). Select New and enter the following:

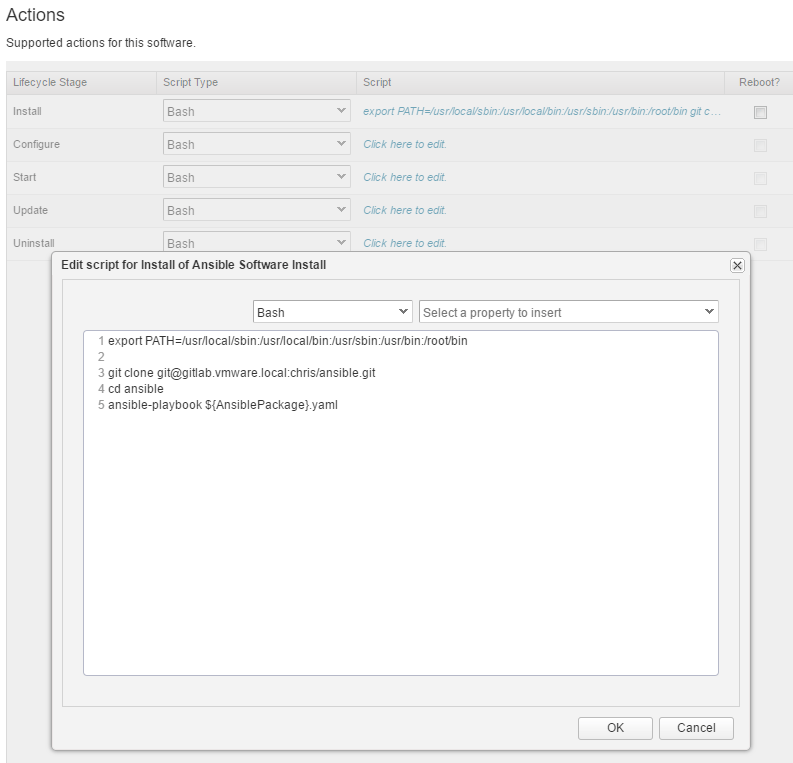
On line number 3 I’ve entered the name of my GitLab server and Ansible repository. You’ll need to update these for your environment. We will cover setting up the GitLab respository later in the post.
This script performs the following:
- Modifies the PATH variable as I’ve had problems with vRA resetting it and the new PATH not containing the needed directories.
- Clones my Ansible repository from my GitLab server
- Changes into the Ansible repo directory
- Executes the Ansible playbook defined by the variable AnsiblePackage, which will be provided from the vRA blueprint
Save and publish the Software Component so that it can be used in vRA blueprints.
As I mentioned in the beginning of the blog post, I chose this method because it’s the easiest to demonstrate. You could also use vRA’s Event Broker Service (EBS) to run a vRealize Orchestrator (vRO) workflow that would run the Ansible playbook from a remote server.
Property Definition
We need to create a vRA Custom Property by going to the Administration > Property Dictionary > Property Definitions > New and fill in the following:
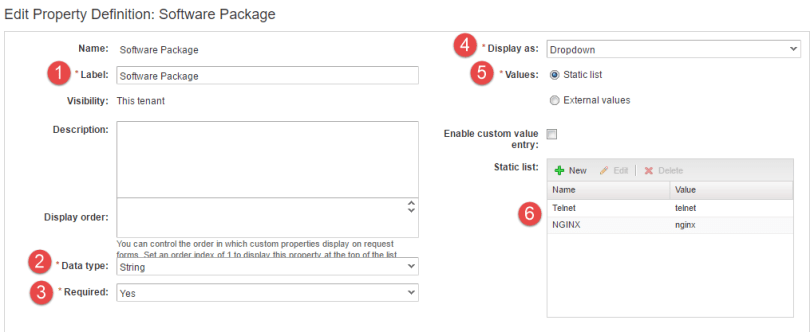
- Label: Software Package
- Data type: String
- Required: Yes
- Display as: Dropdown
- Values: Static list
- Static list:
- Name: Telnet, Value: telnet
- Name: NGINX, Value: nginx
You can change the list values to whatever you’d like, but these are easy for testing.
Blueprint
I’m going to use a simple blueprint using a CentOS 7.2 template. Go to Design > Blueprints and create a new vRA blueprint.
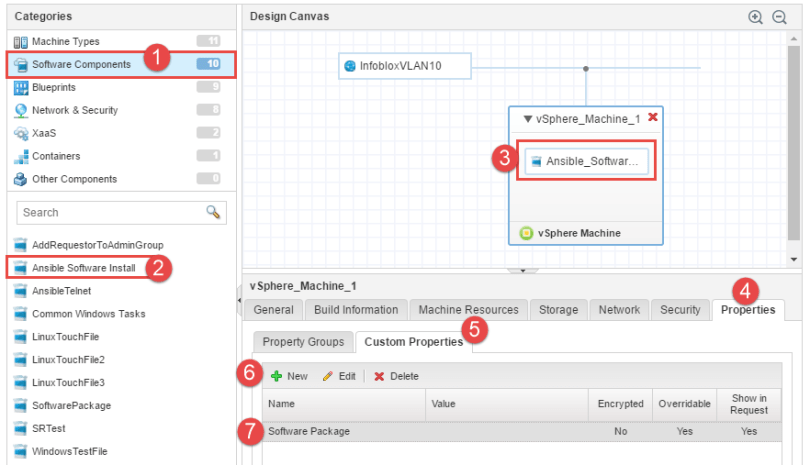
- Under Categories, select Software Components
- Drag Ansible Software Install onto the vSphere Machine element
- Here we can see the software component has been attached to the vSphere Machine element
- Select Properties
- Custom Properties
- New
- Select the software component you created in the proceeding section
Now we will need to bind the value that the user selects from the software package dropdown box during provision to the AnsiblePackage variable defined in the software component by performing the following:
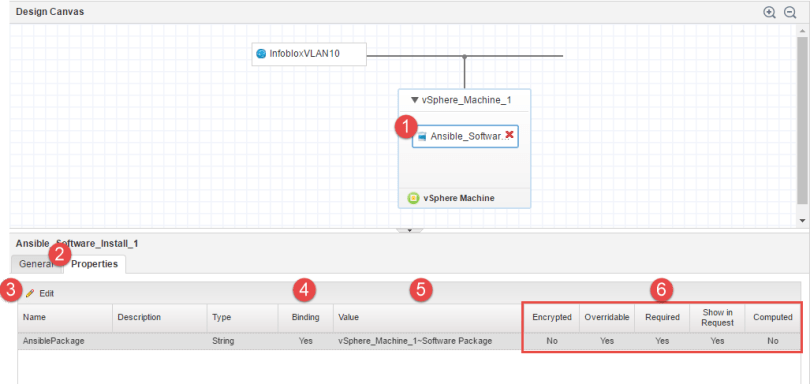
- Select the Software Component in the vSphere Machine element
- Select the Properties tab
- Select Edit
- Change Binding to Yes
- Change Value to vSphere_Machine_1~Software Package
- Make sure the remaining options are set as displayed
Save the blueprint and make it available as a catalog item. When a user request the machine they will be able to select what software to be installed via Ansible:
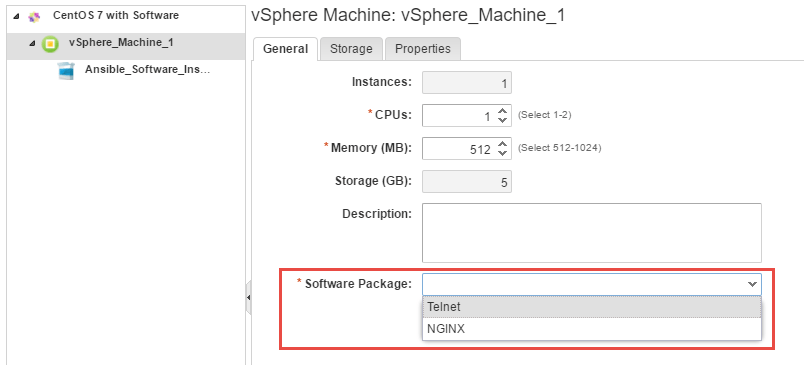
When a user selects what software to install on the machine, their selection is stored in the Software Package variable in the Property Definition. Because of the binding we set up on the blueprint, the Software Package variable is stored in the AnsiblePackage variable in the Software Component. The Software Component will then run the bash script that uses the AnsiblePackage variable to install the software that the user selected during provisioning.
GitLab
You can download GitLab Community Edition here. I running GitLab on CentOS 7 so I used these instructions. Choose and password and login on the next screen with root and your new password.
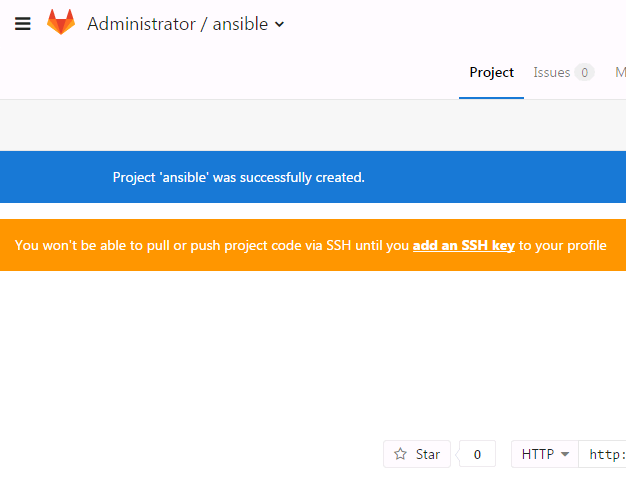
Create a new project by clicking the + sign in the upper-right:

I’m naming my project ansible:

If you’re familiar with setting up git repositories, you’ll probably be used to following the CLI instructions, but I’m going to do things through the UI as it will be easier to demonstrate.
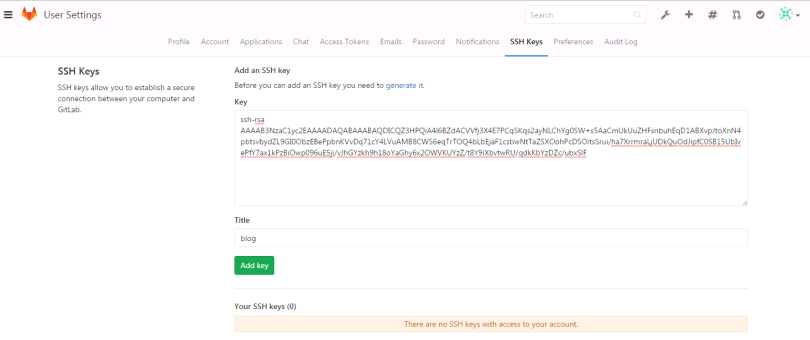
Before we can create any files in your repository we will need to click the add an SSH key:
Add your Key and give it a Title:
Go back to the Dashboard by clicking on the fox icon in the upper-left hand corner and you’ll see our ansible repo:

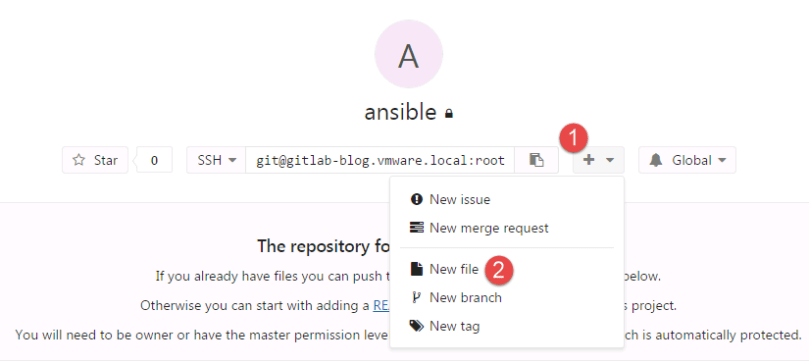
Let’s create our first file by selecting
- The + sign
- New file
Perform the folowing:
- Give the file a name
- Paste in the text below
- Enter a commit message
- Commit your changes
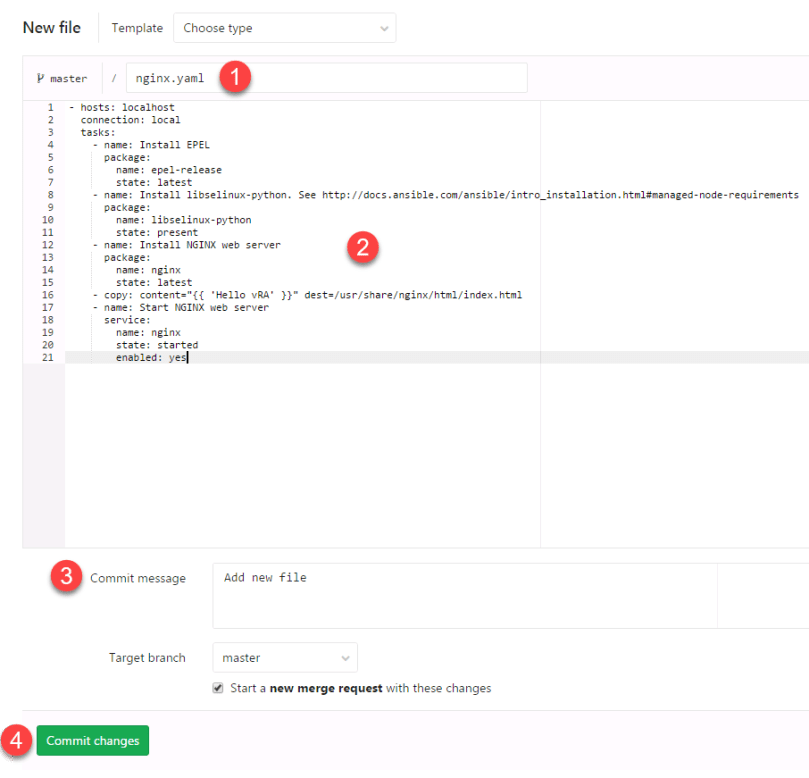
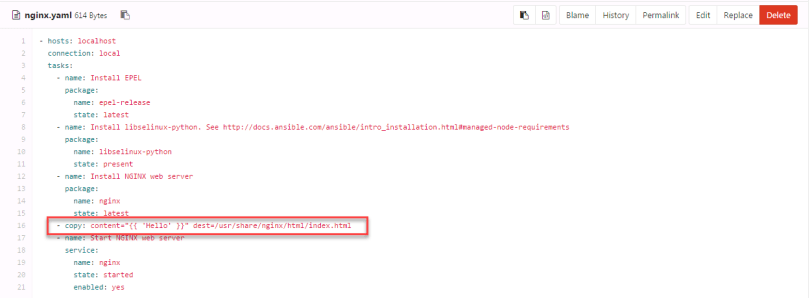
Here is the yaml file in text. WordPress may mess up the formatting so if you try to use this, you’ll want to run it through a YAML validator like you can find at http://www.yamllint.com/
- hosts: localhost
connection: local
tasks:
- name: Install EPEL
package:
name: epel-release
state: latest
- name: Install libselinux-python. See http://docs.ansible.com/ansible/intro_installation.html#managed-node-requirements
package:
name: libselinux-python
state: present
- name: Install NGINX web server
package:
name: nginx
state: latest
- copy: content="{{ 'Hello' }}" dest=/usr/share/nginx/html/index.html
- name: Start NGINX web server
service:
name: nginx
state: started
enabled: yes
This Ansible playbook will install the NGINX web sever and display a static web page with the word Hello.
We’re done with GitLab for now.
Jenkins
Installation and Configuration
You can download Jenkins from here. I’m going to install Jenkins on a Windows server since I’m going to be utilizing Powershell. You could also install Jenkins in on Linux and/or in a container and use Powershell in a container.
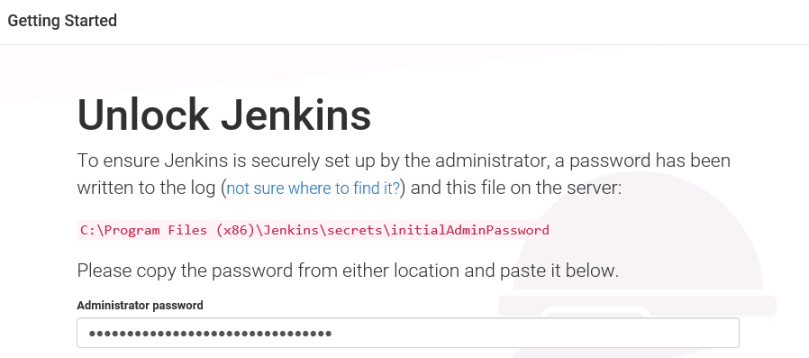
Download the Windows MSI and run through the wizard. You should be directed to http://localhost:8080 where you’re asked to enter the administrator password:
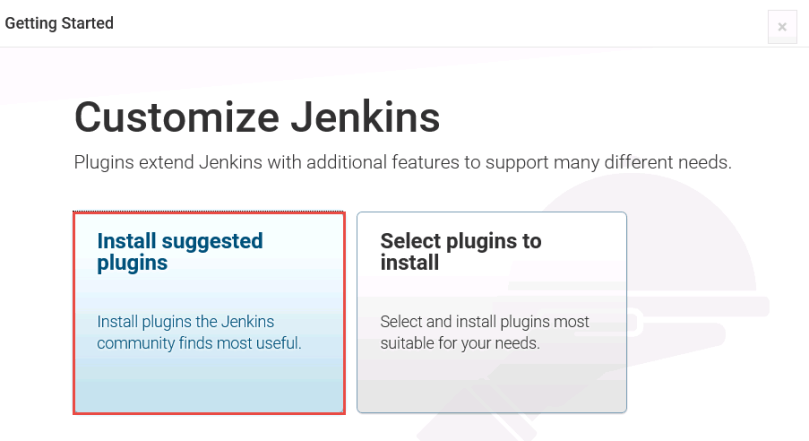
Select Install suggested plugins:
Create your user:

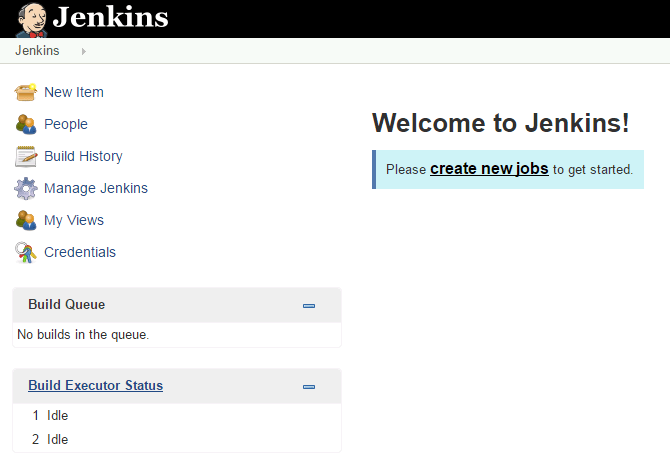
Select Start using Jenkins

Install the GitLab and Powershell plugins
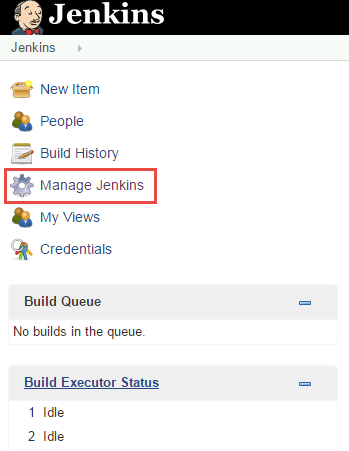
Select Manage Jenkins from the menu:
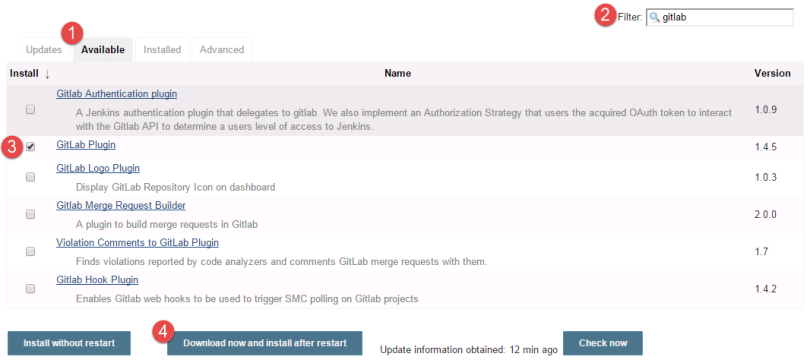
Select Manage Plugins then
- Select the Available tab
- Type GitLab in the filter
- Check GitLab Plugin. Do the same for the Powershell plugin
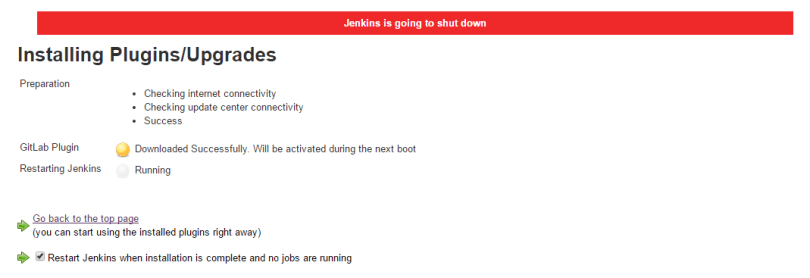
- Download now and install after restart
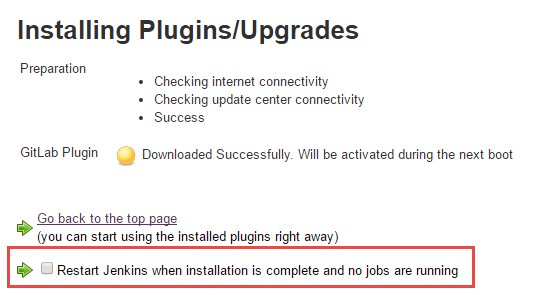
Check the box below to restart Jenkins and install the plug-in:
If it hangs at this screen, you may need to fresh the browser:
Go to Manage Jenkins > Manage Plugins > Installed tab and verify the GitLab and Powershell plugins are installed:

Create our Jenkins job/project
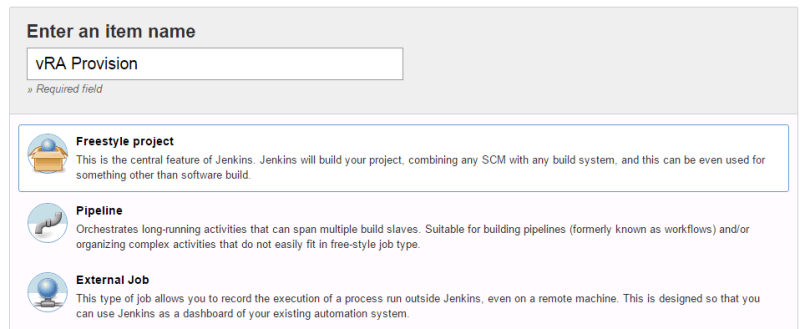
We can create our Jenkins job by clicking create new jobs:
Give the job a name and select Freestyle project:
I’m not going to cover other types of jobs such as Pipeline or Multibranch Pipeline in this post, but I have those running in my lab so if you’re familiar with them, you can use them too.
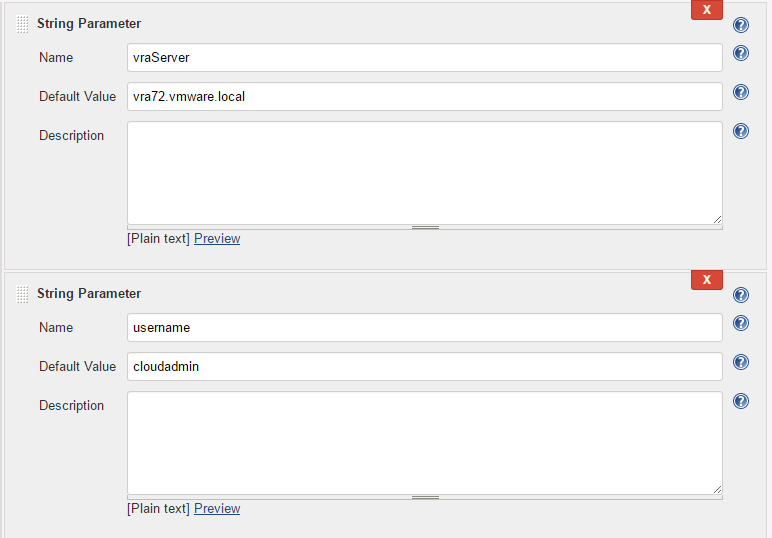
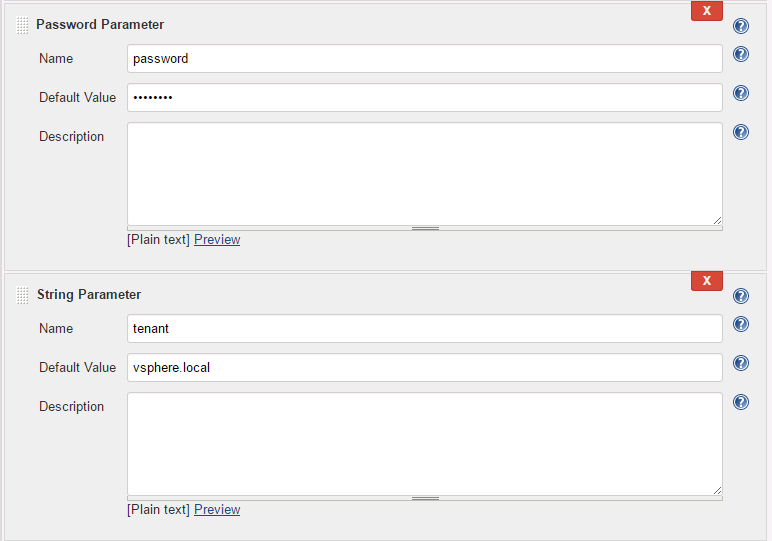
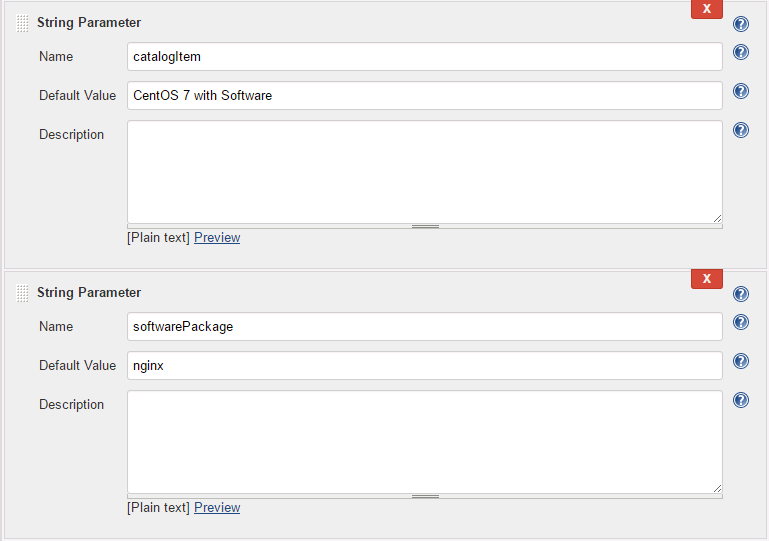
Press OK and you’ll be taken to the General tab. Scroll down until you see This project is parameterized and check it. We are going to add six parameters. You’ll need to make changes that are specific to your environment:
- vraServer = vra72.vmware.local, type: String
- username = cloudadmin, type: String
- password = cloudadmin’s password, type: Password
- tenant = vsphere.local, type: String
- catalogItem = CentOS 7 with Software, type: String
- softwarePackage = nginx, type: String
The parameters will look like this.
Select the Build Triggers tab. Check build when a change is pushed to GitLab…
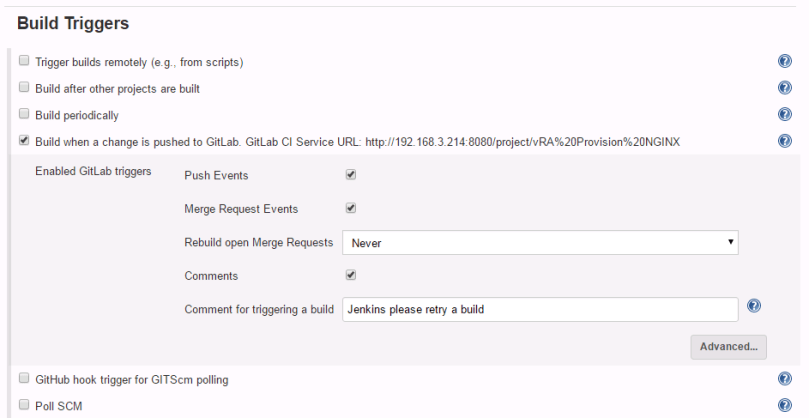
Here you’ll see the URL of your Jenkins server. We will need this later, but can ignore it for now.
Select the Build tab and then Add build step > Windows Powershell and enter the following code. Note that this isn’t production quality code as I just threw it together:
$vraServer       = $env:vraServer
$username        = $env:username
$password        = $env:password
$tenant          = $env:tenant
$catalogItem     = $env:catalogItem
$softwarePackage = $env:softwarepackage

$url = "https://$($vraServer)/identity/api/tokens"

$properties = @{'username' = $username; 'password' = $password; 'tenant' = $tenant}

$bodyObject = New-Object –TypeName PSObject –Property $properties

$body = $bodyObject | ConvertTo-Json

$headers = @{"Content-Type" = "application/json"; "Accept" = "application/json"}

$request = Invoke-WebRequest $url -Method POST -Headers $headers -Body $body
$contentObject = $request.content | convertFrom-json
$bearerToken = $contentObject.id

$url = "https://$($vraServer)/catalog-service/api/consumer/entitledCatalogItems/"
$headers = @{"Content-Type" = "application/json"; "Accept" = "application/json"; "Authorization" = "Bearer ${bearerToken}"}
$request = Invoke-WebRequest $url -Method GET -Headers $headers
$contentObject = $request.Content | ConvertFrom-Json
$consumerEntitledCatalogItem  = $contentObject.content | ? { $_.catalogItem.name -eq $catalogItem }
$consumerEntitledCatalogItemId = $consumerEntitledCatalogItem.catalogItem.id
$url = "https://$($vraServer)/catalog-service/api/consumer/entitledCatalogItemViews/$($consumerEntitledCatalogItemId)"
$request = Invoke-WebRequest $url -Method GET -Headers $headers
$contentObject = $request.Content | ConvertFrom-Json
$requestTemplateURL = $contentObject.links | ? { $_.rel -eq 'GET: Request Template' }
$requestPOSTURL = $contentObject.links | ? { $_.rel -eq 'POST: Submit Request' }
$request = Invoke-WebRequest $requestTemplateURL.href -Method GET -Headers $headers

$requestObject = $request.Content | ConvertFrom-Json
$requestObject.data.vSphere_Machine_1.data.'Software Package' = $softwarePackage
$content = $requestObject | convertto-json -compress -depth 100

try {
$request = Invoke-WebRequest $requestPOSTURL.href -Method POST -Headers $headers -body $content
}
catch {
write-host "Provisioning request failed"
write-host "$($_.Exception.message)"
exit 1
}
Finally, we can save the project.
Let’s run the job to make sure it can successfully provision a machine in vRA. Select Build with Parameters and the parameters should be filled in:

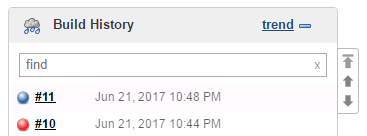
We can view the status of the request under Build History.
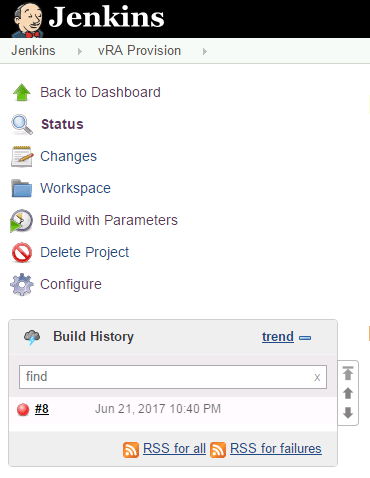
Oh no it failed! If it succeeded, it would be blue (or green if you have the Green Balls plugin installed). We can get more detail on the job by selecting it and viewing Console Output:
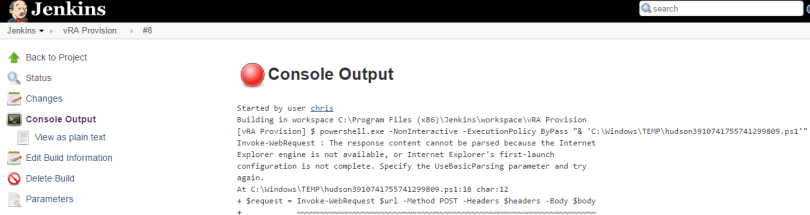
Hmm… well I don’t know about this error and I don’t see it in my main Jenkins environment (I installed this one just for this blog post). I’m just going to do as it says and add the usebasicparsing parameter to my Powershell script. Select Back to Project and then Configure. On each line in the Powershell script that starts with $request, add -usebasicparsing so the first entry would go from this:
$request = Invoke-WebRequest $url -Method POST -Headers $headers -Body $body
to
$request = Invoke-WebRequest $url -Method POST -Headers $headers -Body $body -usebasicparsing
Save the project and build it again. Yay it worked:
Now if we view the Console Output of the job we see:

Then if we go into vRA we should see the provison in progress:

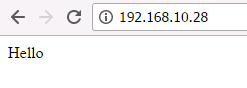
After the provision completes, you should be able to go to the IP and see the web page served up by NGINX.
Configure GitLab to automatically trigger the Jenkins job
The last thing we are going to do is to configure GitLab to automatically run the Jenkins job that provisions our vRA instance.
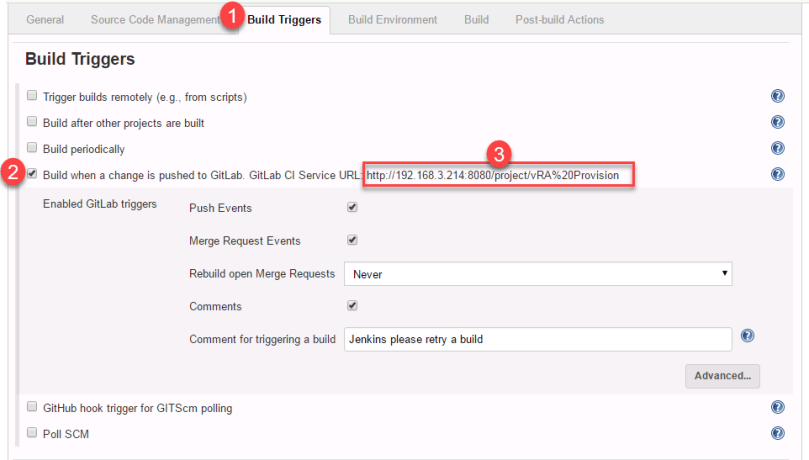
First we need to back into Jenkins, select your job and then select Configure. Once in the job:
- Select Build Triggers
- Make sure “Build when a change is pushed…” is still selected
- Copy the URL
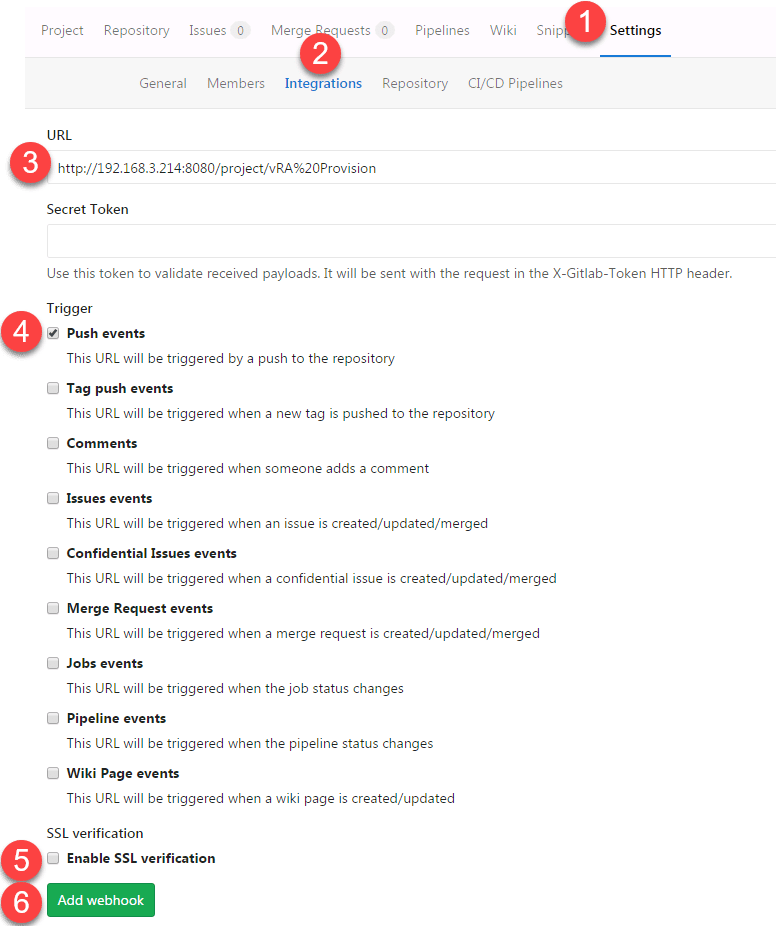
Now that we have the URL that we are going to push to, let’s go back into GitLab, select your project to access it and:
- Select Settings
- Select Integrations
- Enter the URL we got from Jenkins
- Make sure Push events is selected
- I’m disabling SSL verification in this example, but I have it enabled in my other environments
- Select Add webhook
If successful, you can scroll down to view the new Webhook:

The the little Test button? Let’s click that. You should get the message:

Then if you switch over to Jenkins real quick you should see:

Then in vRA we will see:

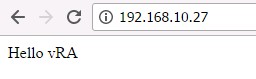
Once the machine provisions we should see a simple web page that says Hello

since is this is what we have set on line 16 of our nginx.yaml file:
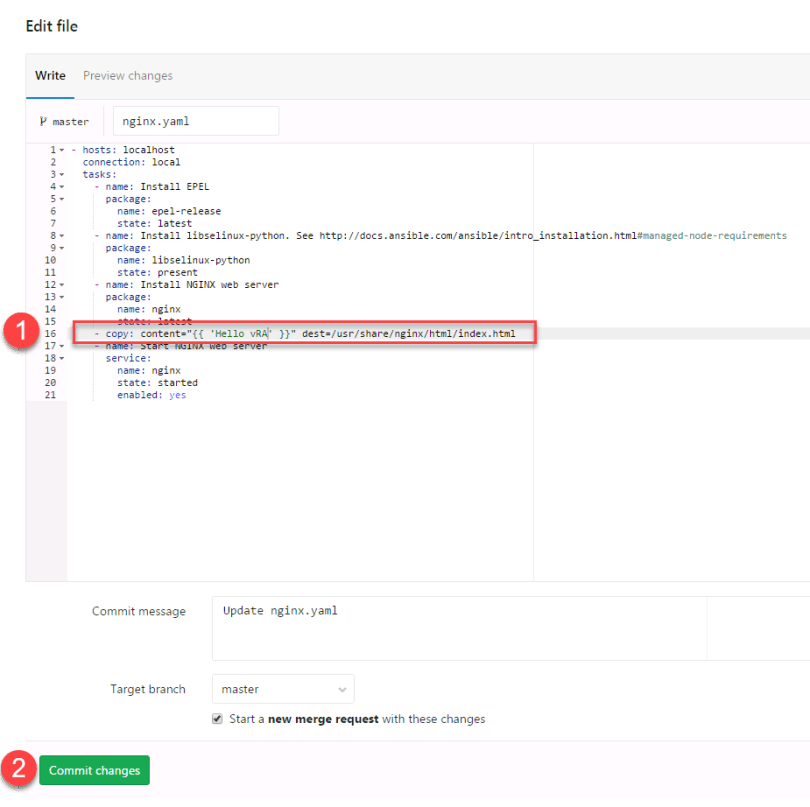
Let’s test the full stack by changing nginx.yaml. Select Edit

and you’ll be taken to the editor view.
- Change Hello to Hello vRA
- Select Commit changes
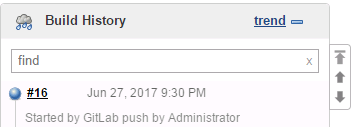
You should see:

Then the Jenkins job started:
Then the vRA request:

Finally we can see that our vRA machine was successfully provisioned using the new code that we pushed up to our repository: